Russel Family FFR Roadster Build
Wednesday, November 26, 2014
Friday, May 13, 2011
Sorry for those of you that were waiting for updates… Although I am not getting things completed as fast as I would like, progress has been made.
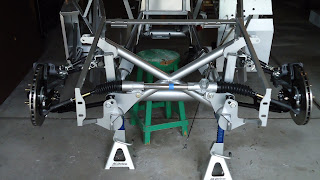
I have installed the front suspension minus the shocks (they are on backorder) most of which was fairly straight forward. I problem spent more time thinking and reading about how to install the suspension then the actual hands on work.
You can see from the above photo that there is a few inches of toe out on each side, nothing that my new trusty Dremel tool can’t handle.
Once I cut off 1” off the outer tie rods I was able to adjust the arms and get the wheels straightened out enough to leave well enough alone until I get the wheels on for a pre-alignment.
You can see from the above photo that there is a few inches of toe out on each side, nothing that my new trusty Dremel tool can’t handle.
As you can see from the front suspension pictures, I also installed the front brakes – I must be honest. This is the first time I have touched a set of calipers and brake pads since I was a teenager and I looked at all of the parts and I didn’t have a clue how to put this puzzle together.
A quick email to my friend Paul Hartman to see if he wanted to meet for lunch and I brought my box of parts and pieces and Paul gave me the first hand knowledge I was looking for.
I also decided to get the engine bay aluminum panels powder coated to match the powder coating of the chassis. You can see the nice match up on this F Panel. All the other panels I have treated with Sharkhide metal protectant since these will not be visable they only need to be sealed so that the aluminum does not oxides.
Jacob came over and helped to install the footbox.
Sunday, April 10, 2011
Drill baby drill… Aluminum Panels.
Well I have most of the aluminum panels drilled along with installation of the upper and lower control arms. The shocks are on back order, so I have as much completed for now until the rest of my aluminum panels are shipped to me along with the remaining back order parts.
Now that I have seen the actual color of the powder coated chassis, I have decided to powder coat the aluminum panels the same color. Well, at least the panels that are in the engine bay. These are the only panels that visible and I since I like the silver color of the chassis, I think that matching panels will look nice. I will find a place to get them powder coated in the next couple of weeks.
Front LCA/UCA’s
I spent a few hours trying to get the dust boots to cover the upper ball joints. They seemed to be a little to small. After reading several possible fixes on ffcars.com, I was able to finally get the dust boots installed using 2" PVC pipe. You just press on the boot dust cover with the 2" pipe and wallah it slips right on.
Saturday, April 2, 2011
First Build Milestone Achieved!!!
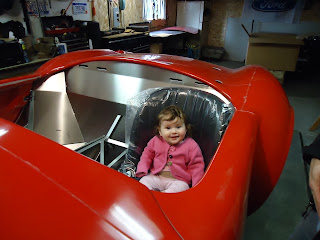
Today Chris, Aimee and Ruth-Ann came by to take a look and we completed the first project milestone. The body is off the chassis and on the body buck! Chris and I talked about different options and color schemes along with the overall build process. It is nice to be able to not only talk about the build but actually start the work that I have been planning for.
Here is a picture of Ruth-Ann sitting in the drivers seat.
The body is off the chassis and onto the body buck!
FFR 7469 has arrived!!!
Well it was worth the wait, yesterday we unloaded the body/chassis along with 24 boxes.
Jacob came home to help unpack while we grinned and stared in awe. We had to take the first pictures behind the wheel and make the vroom sound...
What a great day and everything is inventoried with only a few items on backorder. Now it is time to start the build...
Wednesday, March 30, 2011
Roadster Build Plan
Finally finished the build plan and wanted to publish this as it is now written in stone (except for what I decide to change!).
Build Overview with details to follow.
· Kit - Factory Five Racing – MK4 Roadster Complete Kit / 15 year Anniversary Edition.
· Engine – Ford Racing Crate Engine 302
· Transmission - 5 Speed Manual, T-5Z
· Suspension / Differential - independent front suspension, 3 link rear suspension with a Moser 8.8 Rear End and KONI Coil over shocks
· Wheels / Tires - Halibrand-style vintage wheels with pin drive racing spinners.
· Steering / Brakes – 15:1 manual steering, 13” 4 wheel disc brakes.
· Electronics / Wiring – FFR supplied wiring harness
· Interior - as close to authentic as comfortably possible, amenities will be hidden / subtle.
· Body – Color TBD, 2 options. Black with ghost stripes or blue with white stripes.
Drivetrain
Ford Racing Boss 302 with Powerjection 3 EFI (~350 HP)
Ford Racing Boss 302 with Powerjection 3 EFI (~350 HP)
Ford Cobra Clutch with Forte Hydraulic Clutch system
Tremec T5Z Transmission (.63 5th gear)
Moser 8.8 rear end with 3.55 gear
Suspension
Objective: good ride and handling, street use, adjustable, common parts, maintainable, PosiTraction rear-end.
Objective: good ride and handling, street use, adjustable, common parts, maintainable, PosiTraction rear-end.
FFR front Upper & Lower Control Arms w/ Koni coil-over shocks.
Rear FFR 3 Link Suspension w/ Koni coil-over shocks.Steering / Brakes
Objective: good steering and braking characteristics, simple to setup and maintain, general street use.
• FFR 15:1 Manual Supplied Steering
• FFR 13” 15 year AE, 4-wheel disc brakes
Objective: good steering and braking characteristics, simple to setup and maintain, general street use.
• FFR 15:1 Manual Supplied Steering
• FFR 13” 15 year AE, 4-wheel disc brakes
• Breeze Offset Steering Rack Bushings
Possible Upgrades:
• ~ Bumpsteer mod (? tbd)
Possible Upgrades:
• ~ Bumpsteer mod (? tbd)
Wheels / Tires
17-inch Vintage Halibrand Replica Wheels
17 x 9 front
17 x 10.5 rear
17-inch Vintage Halibrand Replica Wheels
17 x 9 front
17 x 10.5 rear
Tires:
GoodYear Eagle F1 GS D3
255/45R17 front
GoodYear Eagle F1 GS D3
255/45R17 front
315/35R17 rear
Electronics / Wiring
Objective: Quality and safe wiring that is simple to install and a clean setup.
• FFR supplied wiring harness
Objective: Quality and safe wiring that is simple to install and a clean setup.
• FFR supplied wiring harness
• FFR supplied fuse panel
• Weather-pack connectors
• Trunk-mount battery
• Trunk-mount battery
Interior
Objective: Maintain near original look of the CSX3016, with some modern conveniences, comforts, and improved safety.
• Dash
Objective: Maintain near original look of the CSX3016, with some modern conveniences, comforts, and improved safety.
• Dash
o S/C style dashboard w/vintage gauges layout TBD
o Period style switches, knobs, and indicator lights
o Russ Thompson turn signal (on my birthday wish list)
o Period style switches, knobs, and indicator lights
o Russ Thompson turn signal (on my birthday wish list)
o Under dash courtesy lights
o Rearview mirror mounted on windshield
o Wind Wings & Visors
o Wood (original style) steering wheel
o FFR Floor Mats
o Rearview mirror mounted on windshield
o Wind Wings & Visors
o Wood (original style) steering wheel
o FFR Floor Mats
• Seats
o FFR Supplied Authentic Leather Seats
o Heated seats
o Heated seats
• Transmission Tunnel
o Fire extinguisher, chrome (mounted at front)
o Removable transmission tunnel cover
o Shift chrome ring
o Removable transmission tunnel cover
o Shift chrome ring
• Footboxes / Pedals
o Wilwood pedal box
o Hydraulic clutch (Forte)
o Driver’s side footbox mod (widen)
• Other
o DS Chrome roll bars
o Herb’s door panels
o Fatmat Interior sound deadening material and Heat protection
o FFR Supplied carpet
o Firewall forward mod (TBD)
o Herb’s door panels
o Fatmat Interior sound deadening material and Heat protection
o FFR Supplied carpet
o Firewall forward mod (TBD)
Body
• Base color TBD with TBD Stripes (specific paint colors not identified yet)
• Paint & Stripe underside of hood and trunk
• Riveted Hood scoop w/ Stainless allen head bolts
• Riveted Hood w/ Stainless allen head bolts
• Sharkhide Protected Aluminum Panels
• Base color TBD with TBD Stripes (specific paint colors not identified yet)
• Paint & Stripe underside of hood and trunk
• Riveted Hood scoop w/ Stainless allen head bolts
• Riveted Hood w/ Stainless allen head bolts
• Sharkhide Protected Aluminum Panels
• Removable driver’s footbox top panel
(format from MPTech ffrcars.com)
Tuesday, March 29, 2011
Vette is gone... Now waiting for FFR Roadster
There it is, the final picture of what is... SOLD. This Vette will now ride on European soil as I sold it to a guy in Norway. It was sad to see it go but I am glad that I sold it to a collector who will appreciate this Vette for all its worth and keep it original. I sold it on ebay and it was picked up and shipped down to Atlanta for staging to be crated and put on a cruise across the Atlantic Ocean.
Now if I could just get my new Roadster shipped here. That's right, it is not here yet, I would have hoped to publish pictures of the delivery from Stewart Transportation and according to the folks at Stewart it should have been here on 3/8 and then again they rescheduled with me for a delivery date of 3/24. Still no car. I talked to the owner at Stewart Transportation a couple of days ago and he apologized for all the problems and guaranteed that my kit would be delivered this week. Nice guy, but some of his employees are idiots. Horrible about communication and even worse about keeping commitments. I can honestly say that as far as logistics company's go, they are HORRIBLE at logistics.
Well if nothing else the extra time has allowed me to get the garage prepped and ready for the build, so that is the one positive thing that Stewart Transportation has going for them...
Subscribe to:
Posts (Atom)


